Admin Portal Use Cases
In this article, you will learn how to use the Identity Management API to create, access, and update the Organizations, TMS instances, and Users in the system.
The Identity Management API provides access to the different entities that represent customers of Envase. These entities are Organizations, registered TMS for those Organizations, and the Users that belong to the Organization.
The Identity Management API also represents the associations between those entities. There are certain assumptions being made about those associations that apply to the current implementation of the system, but the requirements might (and most likely will) change in the future.
The design of the Identity Management API has taken into account these future requirements to avoid breaking changes where possible. There are some design decisions that might seem awkward at the beginning, but that will prevent breaking changes in the future.
The following section provides and overview of the entities and their relationships, so you can understand how the Identity Management API works as a system.
System Entites and Relationships Overview
The first entity in the system that you need to understand is the Organization. Organizations represent Envase Technologies customers. Each Envase Technologies customer company will have its own Organization.
Organizations are the central hub to manage all other entities; therefore, it is the first entity that needs to be created when registering a new customer account.
Within an Organization, a TMS entity can be created and associated. A TMS represents an actual TMS application that a customer is using, and it’s associated with its Organization. Currently, Profit Tools is a supported TMS. This means that a TMS entity can be created pointing to a specific instance of Profit Tools.
Important
The Identity Management API has been designed to support multiple TMS instances for an organization, but as of this writing, only one TMS should be registered for each organization. Support for multiple TMS will come in the future and the requirement will be implemented avoiding breaking API compatibility.
The final entity supported is the User. Users can be associated with one and only one Organization. They can also be associated with a TMS. For now, it is important to maintain a one to one relationship between a User and a TMS until multiple TMS support is added.
Important
The Identity Management API has been designed to allow users to access multiple TMS instances, but that support is not available right now. You should make sure that users only contain one TMS association.
There are two types of Users in the system: System Users and Organization Users. Users have a role and this role will dictate their level of access to the system. Let’s take a look at these roles.
System Users are Envase Technologies employees that interact with the Identity Management API for many different reasons. They all, however, have the same role of System Administrators. System Administrators are not associated with any organization, but they can create, access, modify, and delete any entities in the system.
System Administrators can be Envase Technologies techs or support engineers that setup new systems and register new customer accounts. They can also be developers that need to fix problems with the system or identify and fix bad data.
System Users must be part of the Envase Technologies organization, and we should never provide that level of access to external Users.
Organization Users belong to an Organization. These are customer’s employees that need access to our system. They might have different roles, and these roles might be expanded in the future. Currently, these are the Organization Users roles supported:
Organization Administrators (
ORG_ADMIN): They are the administrators for a specific Organization. They can manage their own TMS instances and their own Users.Users (
USER): Users represent employees of Envase Technologies customers. They can access certain services and APIs, but they don’t have access to the Identity Management API.Drivers (
DRIVER): They represent Drivers that work for an Envase Technologies customer. They have access to some services and APIs, but like Users, they don’t have access to the Identity Management API.
Important
Only System Administrators and Organization Administrators have access to the Identity Management API. They should be the only type of users that can access the admin console application.
Creating A System Administrator Account
Creating a System Administrator account is a process outside of the Identity Management API. Only internal Envase Technologies employees should have the power to create and invite System Administrators.
To that effect, we created an AWS Lambda function that allows someone with access to AWS and appropriate permissions to execute the function right from the AWS Lambda console.
The following steps describe the process to create a System Administrator account:
Navigate to AWS Lambda in the Envase Technologies AWS account.
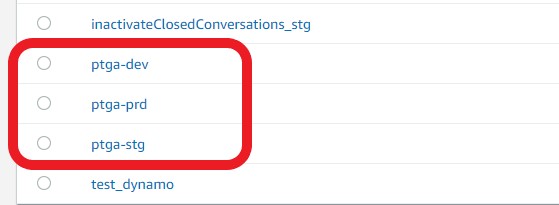
Click on the AWS Lambda function defined for the environment to which you want to add the account. Currently, there are three environments defined with a function for each:
ptga-devfor the Development environment,ptga-stgfor the Staging environment, andptga-prdfor the Production environment.Select the <Test> tab.
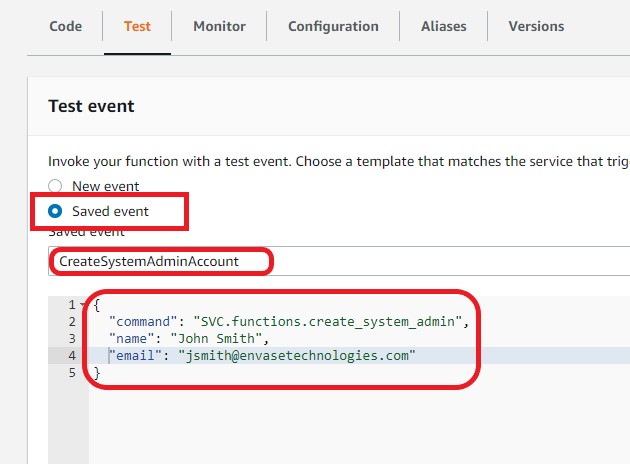
In the test tab, select the <Saved event> radio button and select CreateSystemAdminAccount from the drop down.
In the editor, enter the information about the System Administrator account you want to create in the following format:
{
    "command": "SVC.functions.create_system_admin",
    "name": "John Smith",
    "email": "jsmith@envasetechnologies.com"
}
All the parameters to the event are required. The command parameter is the full qualified name of the function to
execute as shown in the example. The name parameter should be the person’s name. The email is a valid email
address for the user.
Click the <Test> button to execute the function.
The function will create the AWS Cognito identity and all the necessary entries in the Identity Management API as a System Administrator. The function will insure a temporary password is generated for the user, and an invitation email will be sent to the specified address.
The user will have to click on the link provided in the invitation email to confirm the account and to change the provided temporary password to a valid password to log into the system.
Registering A New Account
System Administrators need to create new accounts for Envase Technologies customers. This is one of the first use cases addressed by
the Envase Connect Admin Portal. To help the Envase Connect Admin Portal implement this feature, the Identity Management API exposes an accounts service that will create all the
necessary entities for a new customer.
The accounts service can only be invoked by System Administrators, and you can try it with your System Administrator account:
POST https://core.envaseconnect.cloud/identity/accounts
The request must provide the X-Api-Key header with the key issued for your application, as well as the AWS Cognito id
token for the user in the Authorization header.
Tip
You might have used authenticated requests against other services, and they usually prefix the token with the
token type. For example, a bearer token is specified as Bearer <the-id-token> in the authorization header. This is
not the case for the AWS Cognito authorizer. The Authorization header should be set to the id token part returned
by AWS Cognito with no prefixes:<the-id-token>.
The body of the request has the following structure:
{
    "organizationName": "Fast Transportation",
    "tmsName": "Fast Transportation TMS",
    "tmsType": "PROFITTOOLS",
    "tmsUrl": "https://api.fasttransportation.com",
    "adminName": "John Smith",
    "adminEmail": "jsmith@fasttransportation.com"
}
All the properties in the request payload are required. Any missing parameters will generate a 400 BAD REQUEST
response.
The organizationName should be set to the name of the new customer company, and it will be used to create a new
organization.
The tmsName, tmsType, and tmsUrl are parameters to register the TMS instance for the customer. At this time,
it’s required to register a TMS for the customer.
The adminName and adminEmail are parameters to create the Organization Administrator user for the account. Those parameters are used to
create the AWS Cognito identity, which will trigger an invitation email with a temporary password, and the User information
in the Identity Management API.
Important
The accounts service doesn’t support a role property for the user because it assumes that the first user
created for a new account will be the Organization Administrator.
The accounts service can also return 401 UNAUTHORIZED when the authorization header is missing, or 403 FORBIDDEN
when the user sending the request is not a System Administrator.
The response will have the following structure:
{
    "id": "1d49b8c1-b988-4014-bf5b-bef304abc79b",
    "self": "/identity/accounts/1d49b8c1-b988-4014-bf5b-bef304abc79b",
    "organization": {
        "name": "Fast Transportation",
        "id": "1d49b8c1-b988-4014-bf5b-bef304abc79b",
        "href": "/identity/organizations/1d49b8c1-b988-4014-bf5b-bef304abc79b"
    },
    "tms": {
        "id": "1d49b8c1-b988-4014-bf5b-bef304abc79b",
        "href": "/identity/organizations/1d49b8c1-b988-4014-bf5b-bef304abc79b/tms/be4a9165-97a0-4740-bcf9-f8a3850b1418",
        "name": "Fast Transportation TMS"
    },
    "user": {
        "id": "b746d763-6666-4002-b7bb-b76f8052f4e5",
        "href": "/identity/users/b746d763-6666-4002-b7bb-b76f8052f4e5",
        "cognitoId": "b746d763-6666-4002-b7bb-b76f8052f4e5",
        "name": "John Smith",
        "email": "jsmith@fasttransportation.com",
        "role": "ORG_ADMIN",
        "organizationId": "1d49b8c1-b988-4014-bf5b-bef304abc79b"
    }
}
The response includes information about the Organization, TMS, and Organization Administrator user that has been created.
Adding Users to An Organization
At some point, an Organization Administrator will want to invite users to its Organization and provide them with access to the TMS they will be working on. This process involves a couple of operations against the Identity Management API: the user account has to be created, and the user has to be associated with the TMS to provide access.
The following services are exposed in the Identity Management API that allow Organization Administrators create User accounts:
Creating the User Account
The Identity Management API provides a Users service to create a new user:
POST https://core.envaseconnect.cloud/identity/users
This service, like all Identity Management API services, requires the X-Api-Key and Authorization headers. The payload for that
service has the following structure:
{
    "name": "Travis Chase",
    "email": "tchase@fasttransportation.com",
    "role": "DRIVER",
    "organizationId": "1d49b8c1-b988-4014-bf5b-bef304abc79b"
}
The request payload requires the name and email for the user. It will use the email information to create
a new AWS Cognito identity for the user and save the information in the Identity Management API.
The role property indicates the role of the user within the Organization. The property should be set to one of the
supported roles for Organization Users: ORG_ADMIN, USER, or DRIVER.
Warning
The System Administrator role (SYS_ADMIN) should never be specified through this service. System Administrator accounts should be created, as
specified in Creating A System Administrator Account.
The organizationId represents the Organization to which the user will be added.
Important
This service can only be called by System Administrators and Organization Administrators. System Administrators can add Users to any Organization, but the Organization id must be
retrieved to populate the organizationId. Organization Administrators can only add Users to their own Organization. Trying to add the User
to a different Organization will cause a 403 FORBIDDEN response.
The response from the service will be the representation of the added User:
{
    "cognitoId": "b746d763-6666-4002-b7bb-b76f8052f4e5",
    "name": "Travis Chase",
    "email": "tchase@fasttransportation.com",
    "role": "DRIVER",
    "organizationId": "1d49b8c1-b988-4014-bf5b-bef304abc79b",
    "id": "b746d763-6666-4002-b7bb-b76f8052f4e5",
    "self": "/identity/users/b746d763-6666-4002-b7bb-b76f8052f4e5",
    "tms": {
    },
    "organization": {
        "id": "1d49b8c1-b988-4014-bf5b-bef304abc79b",
        "href": "/identity/organizations/1d49b8c1-b988-4014-bf5b-bef304abc79b"
    }
}
Notice how the representation of the TMS reference is empty. This is because you haven’t associated the user with a specific TMS.
The User representation provides the organizationId property containing the id of the Organization to which the user has
been added. It also provides a reference to the Organization in the organization property.
Providing the User With Access To A TMS
Once the user is created, you need to associate him with a TMS. To do that, you need to first identify that user within the actual TMS instance. The Envase Connect Core API provides the services to identify users within an instance.
Important
At the moment, only drivers are exposed in Envase Connect Core API because the inital use cases are to allow drivers to use the Envase Mobile App.
You can use the drivers service in the Envase Connect Core API to query for users that will have a DRIVER role:
GET https://core.envaseconnect.cloud/drivers?email=<user_email>
The request queries the TMS instance for a driver that matches the email property of the user we want to correlate.
You can also remove the email query parameter to retrieve all the available drivers.
The response from the service will have the following structure:
{
    "self": "/drivers",
    "items": [
        {
            "id": "12345",
            "self": "/drivers/100",
            "email": "tchase@fasttransportation.com",
            "firstName": "Travis",
            "middleName": "Peter",
            "lastName": "Chase",
            "ref": "D100",
            "status": "ACTIVE",
            "type": "company-driver",
            "medicalExpiration": "2029-12-31",
            "licenseExpiration": "2029-10-15",
            "hazmatCertified": true,
            "hazmatExpiration": "2029-05-26"
        }
    ]
}
Notice the response represents a collection of drivers. Because we filtered the response by email, only one driver
(item) is returned. If the driver was not found, the collection will be empty.
Important
This is consistent for all services that return a collection of resources/entities. Instead of returning 404 NOT FOUND
when there are no matches, an empty collection is returned.
The id property from the driver representation is the TMS internal id for the driver. This value should be used in
all the calls the user makes to the Envase Connect Core API, and it should be stored in Identity Management API so applications can request it.
Once, we have identified the user within the TMS instance, we need to create an association in Identity Management API. The Identity Management API provides a service to create the association:
POST https://core.envaseconnect.cloud/identity/users/:userId:/tms
The request payload has the following structure:
{
    "tmsId": "1d49b8c1-b988-4014-bf5b-bef304abc79b",
    "role": "DRIVER",
    "tmsInternalId": "100235"
}
All the properties in the payload are required. The tmsId should be set to the id of the TMS that was created
with the account. The role is one of the currently supported roles ORG_ADMIN, USER, or DRIVER.
Important
A user has a default role established when the user account is created. The role in the TMS association is
a potential override for that User within the specified TMS. Currently, the override is not supported, so it is
a good practice to use the same role that was used when creating the User account.
Important
For now, we only have support for importing DRIVER users, so that will be the role used.
The tmsInternalId represents the id within the TMS instance. It should be set to the id retrieved in the
previous request.
The response from the service will have the following structure:
{
    "tmsId": "be4a9165-97a0-4740-bcf9-f8a3850b1418",
    "role": "DRIVER",
    "tmsInternalId": "100235",
    "id": "be4a9165-97a0-4740-bcf9-f8a3850b1418",
    "self": "/identity/users/b746d763-6666-4002-b7bb-b76f8052f4e5/tms/be4a9165-97a0-4740-bcf9-f8a3850b1418",
    "url": "https://api.fasttransportation.com"
}
The response represents a User and TMS association. It provides information about the TMS, User role within the TMS,
and the internal id for the user in the TMS instance. It also provides the url of the TMS.
Conclusion
At this point, you’ve seen how to create a System Administrators account to allow internal Envase Technologies employees to register new customer accounts. You’ve also seen how to register a customer account.
You’ve also seen the services exposed in Identity Management API and in Envase Connect Core API to create new User accounts and provide them access to their Organization TMS.
You can send your questions and feedback to the Profit Tools development team through the Envase Mobile Admin Console in the Microsoft Teams Envase account.